Overview
Toolkit container configuration section will helps to understand about containerization as well Rancher desktop / Docker desktop for running toolkit image from local machine to perform offline/online tests.
Toolkit docker container should be in a running state to access toolkit docker container. To run the toolkit docker container, developer can use docker compose / docker run commands to perform their tests.
Toolkit will only support single point of sale integration not for the multiple point of sale integrations.
Developer will have below 3 options to run the docker image from local machine:
Option 1: Configure docker compose to run the toolkit image from docker hub
Option 2: Configure docker compose to run the toolkit image from tar file
Option 3: Using docker run command and run it from local
Docker Compose is a tool for defining and running multi-container Docker applications. With Compose, you use a YAML file to configure your application’s services. Then, with a single command, you create and start all the services from your configuration.
Download docker compose containing definition of docker image, ports, environment and so on.
Sample Preprod configuration url’s filled here.
Click here to know more about other environment’s and their configuration url’s.
• “PosSerialNumber” - This config value to be filled with your POS Serial number value and it should be the equal value in all the configurations.
• “LatestImageTag” - This config value to be filled with toolkit image tag.
Note!
• Port 8020 is the default port value to run your docker container API, if you need to configure another POS device then you need to configure another port and run docker container. For that you need to create a another toolkit folder and keep a copy of the docker compose yml file. In that docker compose yml file, you need to change the __PosSerialNumber__ and port number for ex: 8030 (or) 8040 etc., then it will work.
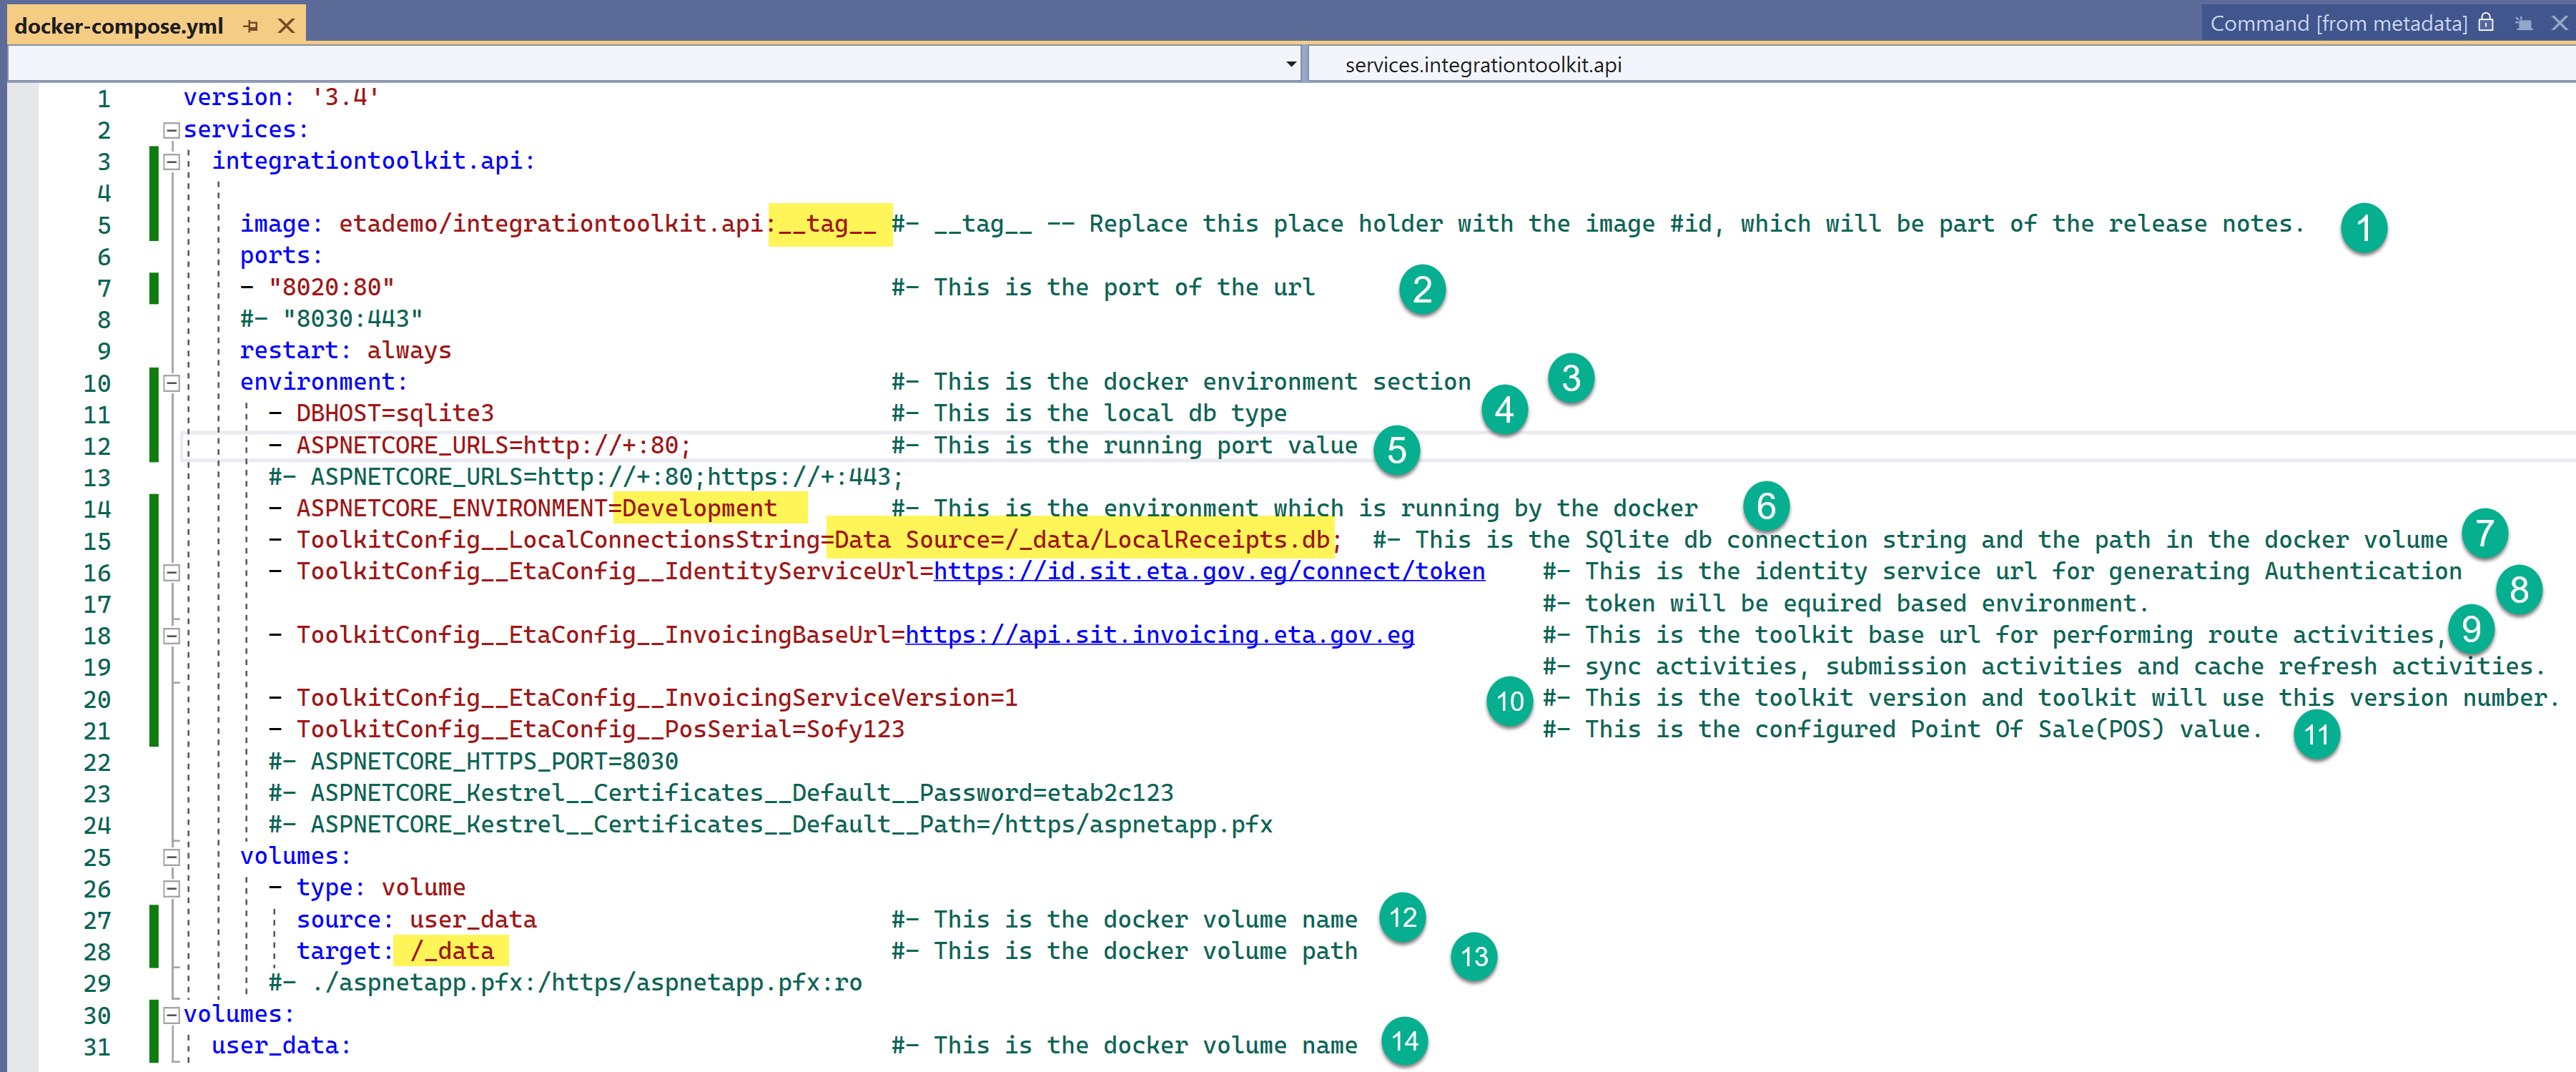
• In the below docker-compose.yml content, __LatestImageTag__ & __PosSerialNumber__ are the place holders. Those values are need to be changed with your actual values to setup your POS device.
Here is the Toolkit Docker compose yml.
version: '3.4'
services:
integrationtoolkit.api:
image: egyptiantaxauthority/integrationtoolkit.api:__LatestImageTag__
ports:
- "8020:80"
restart: always
environment:
- DBHOST=sqlite3
- ASPNETCORE_URLS=http://+:80;
- ASPNETCORE_ENVIRONMENT=Development
- ToolkitConfig__LocalConnectionsString=Data Source=/_data/LocalReceipts.db;
- ToolkitConfig__EtaConfig__IdentityServiceUrl=https://id.preprod.eta.gov.eg/connect/token
- ToolkitConfig__EtaConfig__InvoicingServiceBaseUrl=https://api.preprod.invoicing.eta.gov.eg
- ToolkitConfig__EtaConfig__InvoicingServiceVersion=1
- ToolkitConfig__EtaConfig__PosSerial="__PosSerialNumber__"
volumes:
- type: volume
source: user_data
target: /_data
volumes:
user_data:
Configure docker compose to run the toolkit image from docker hub
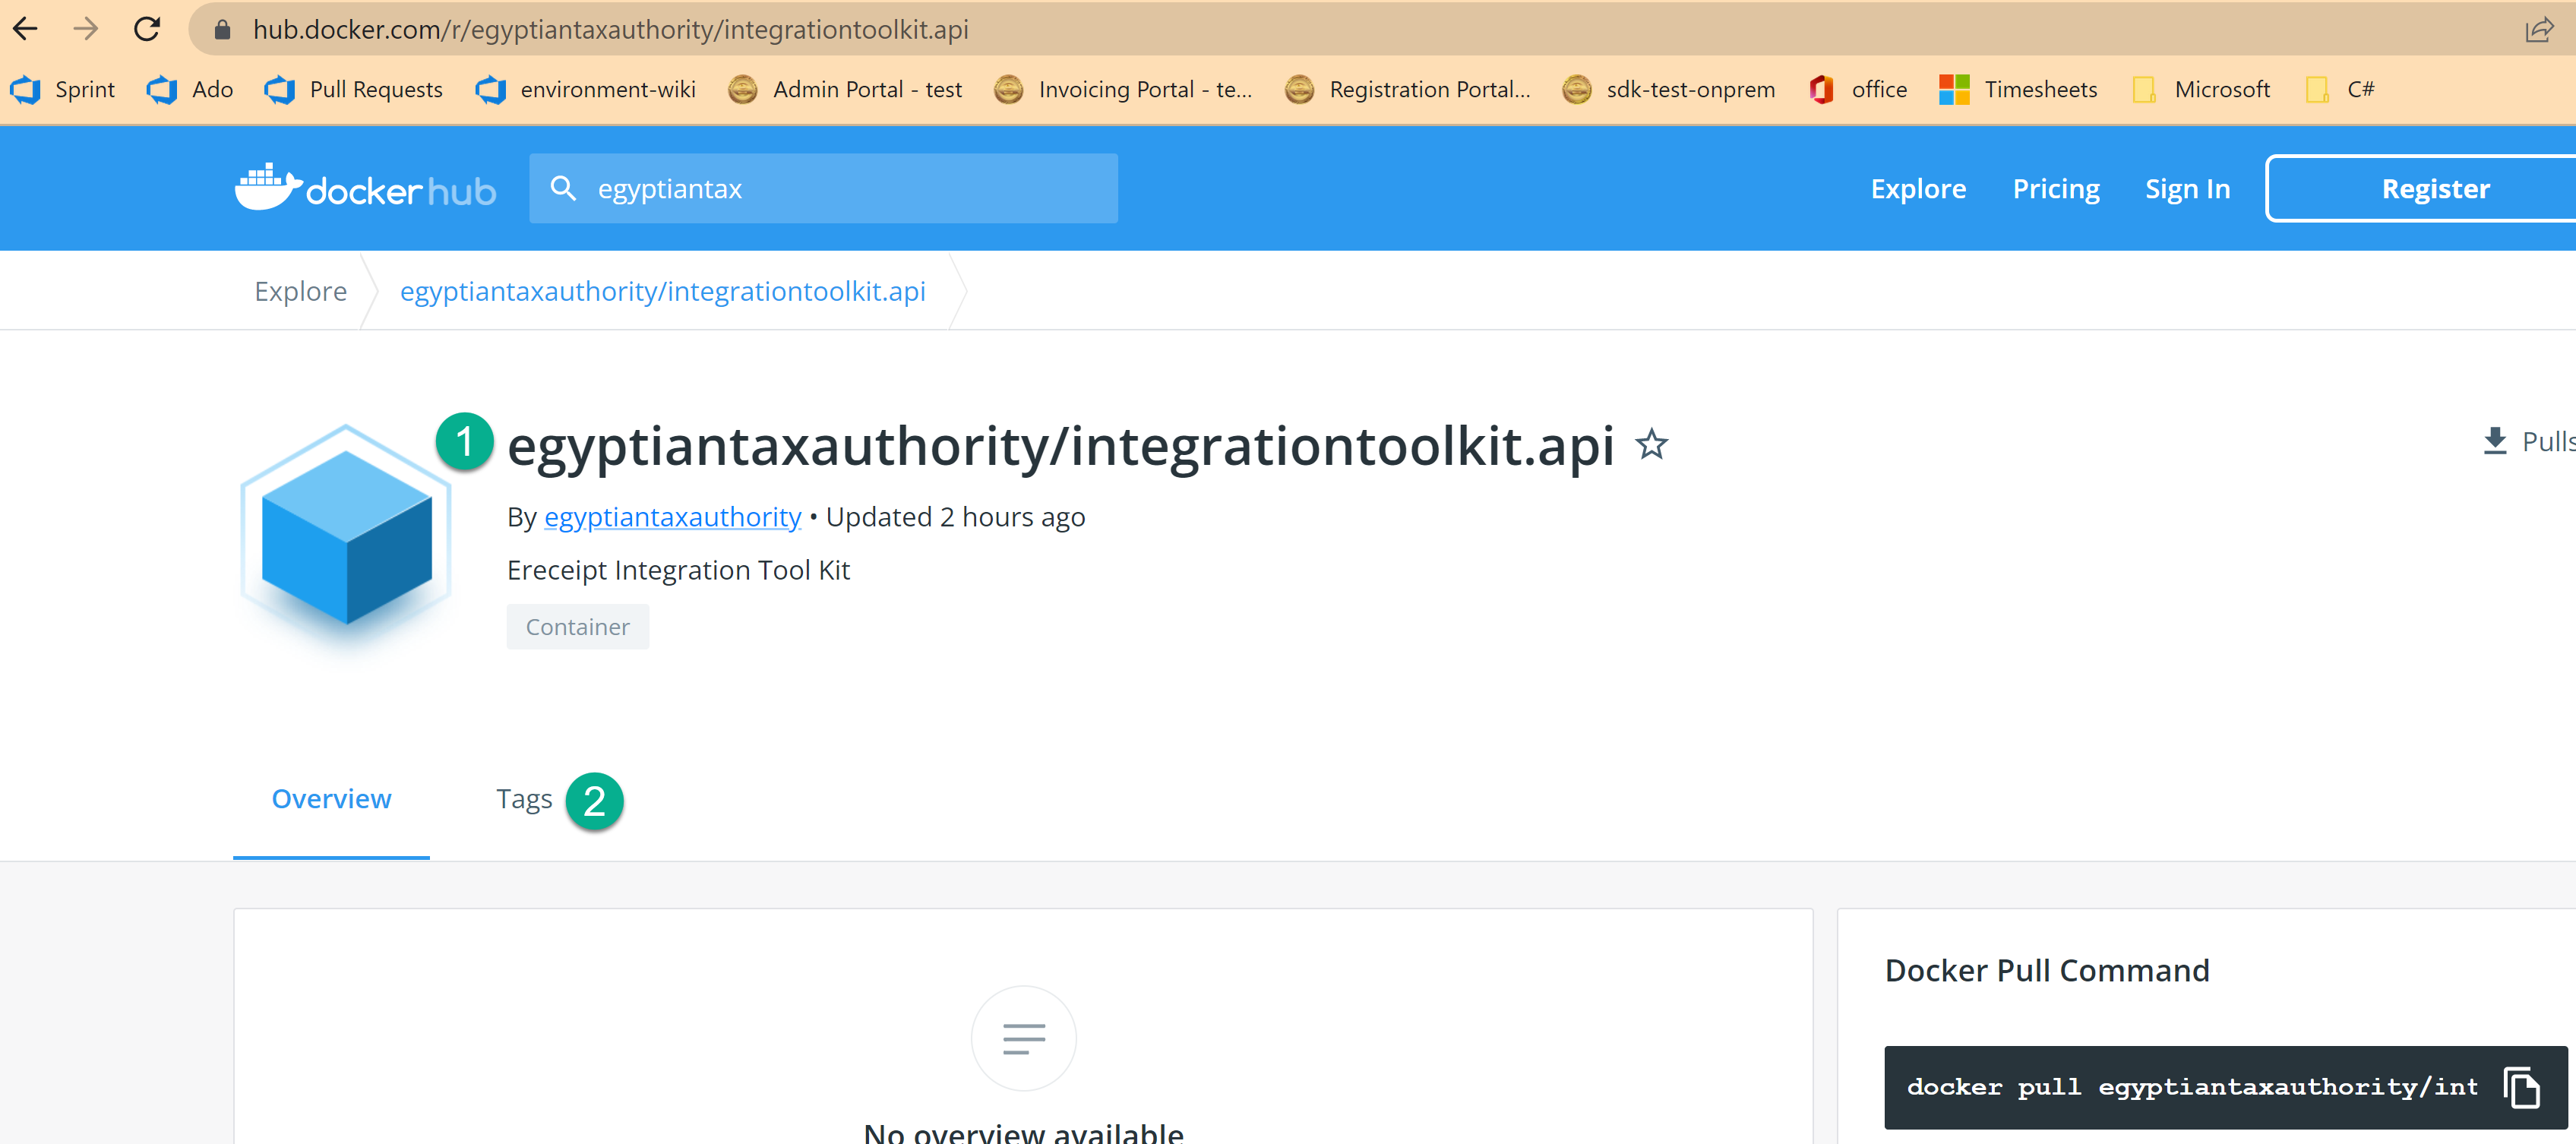
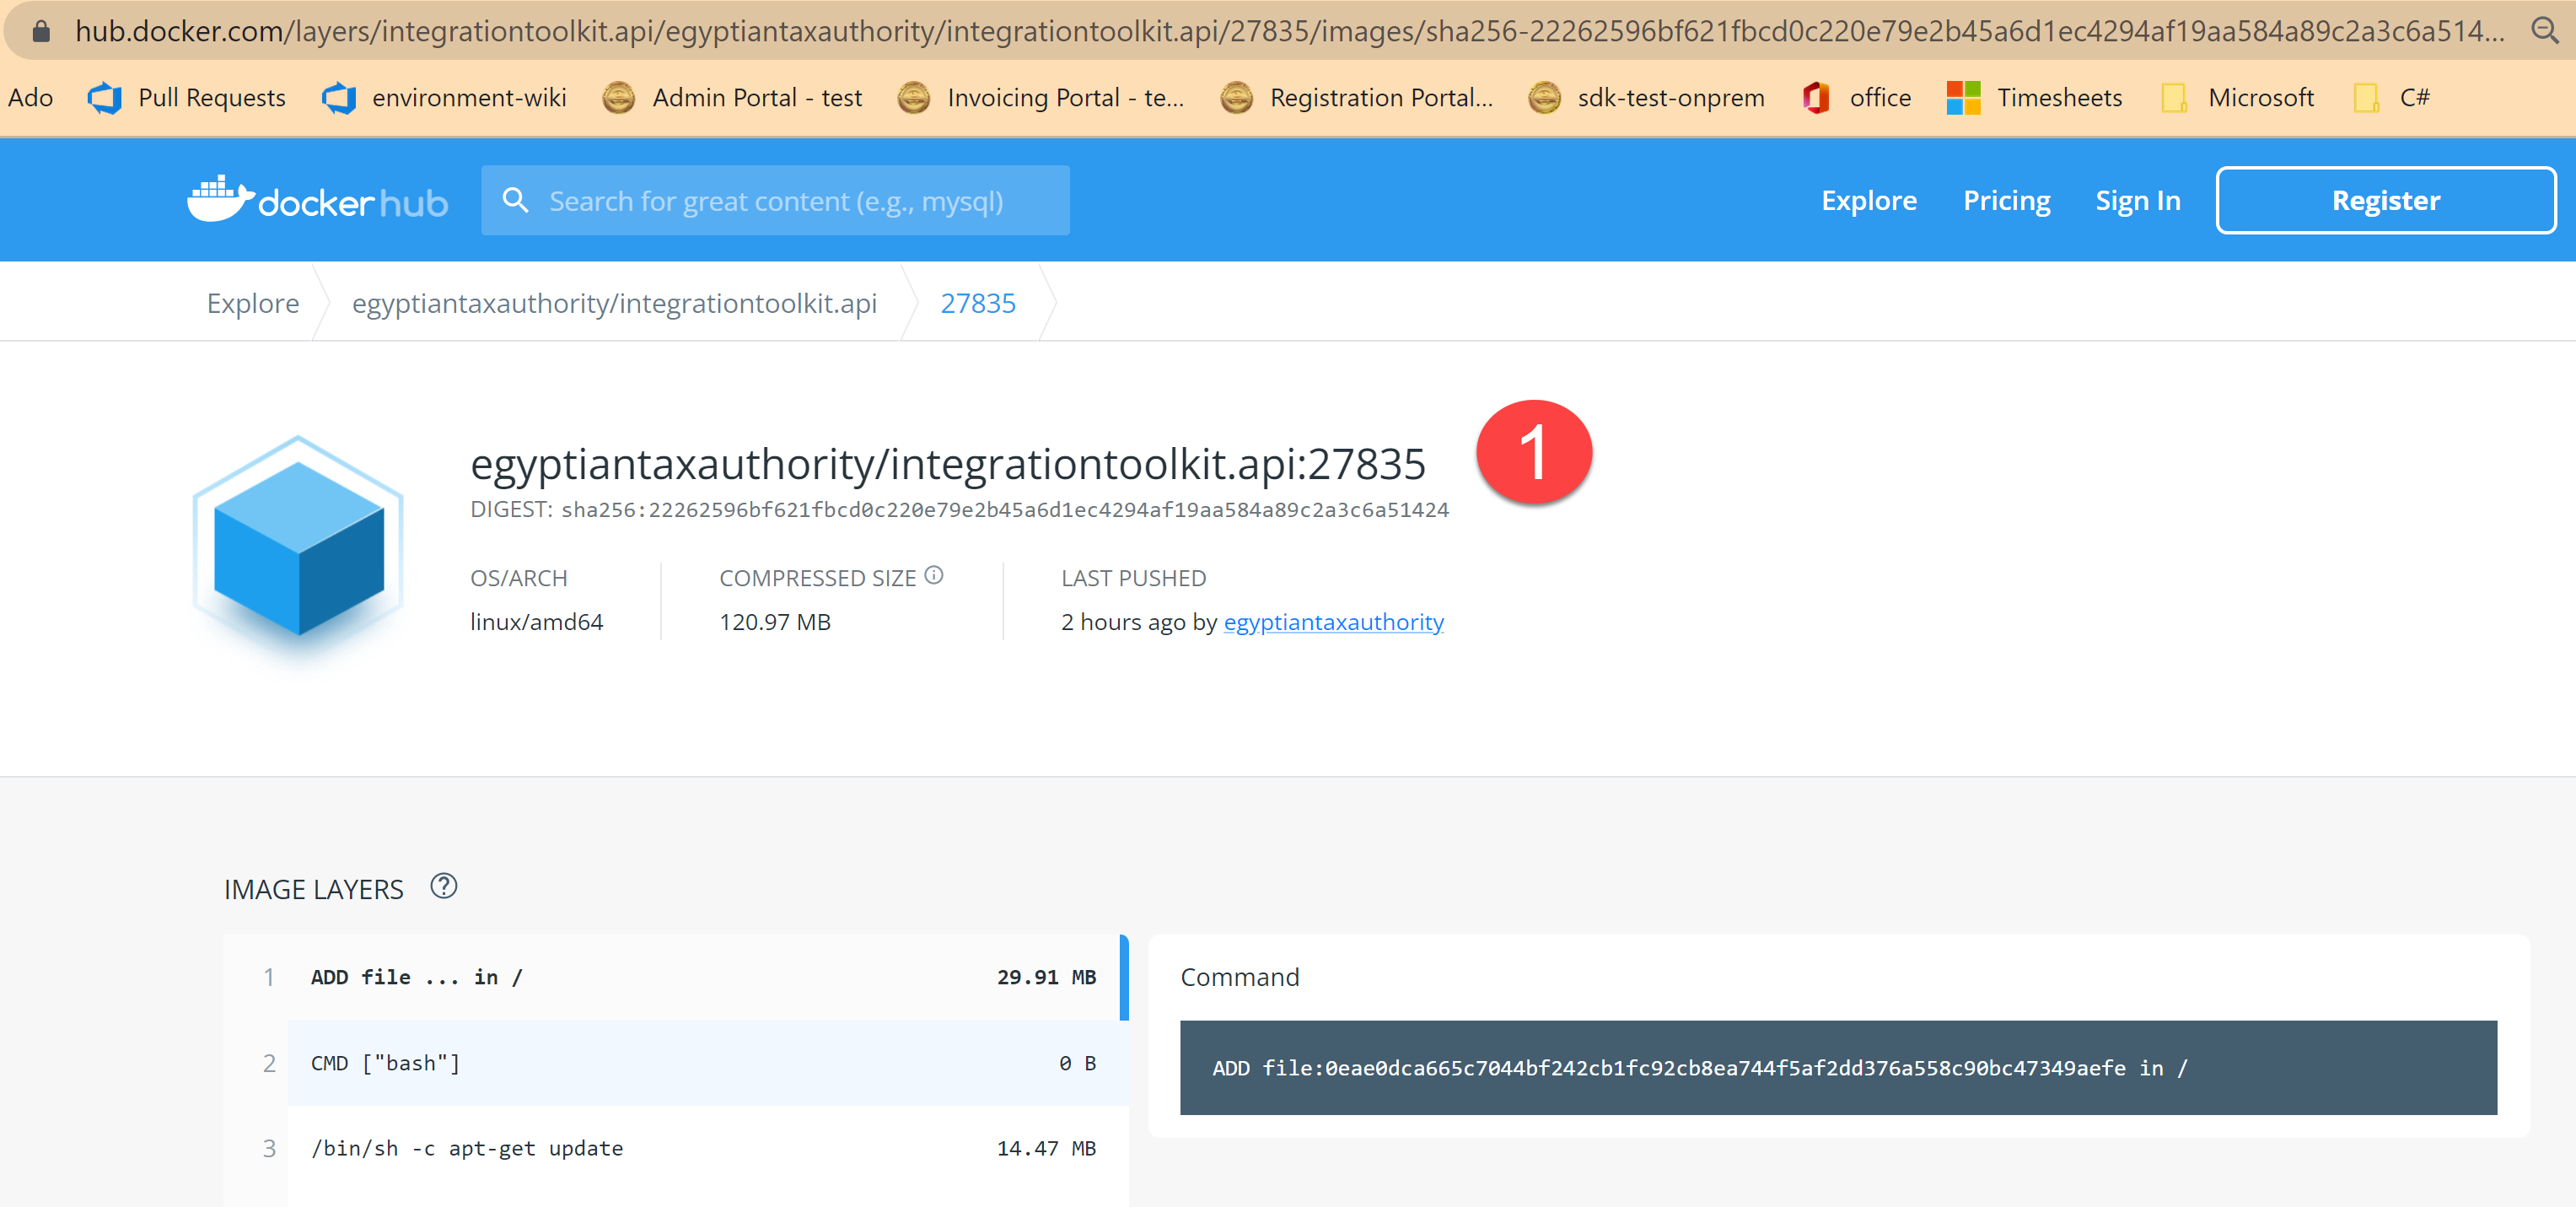
Navigate to the docker hub url to search for egyptiantax repo, you can find egyptiantaxauthority/integrationtoolkit.api image.
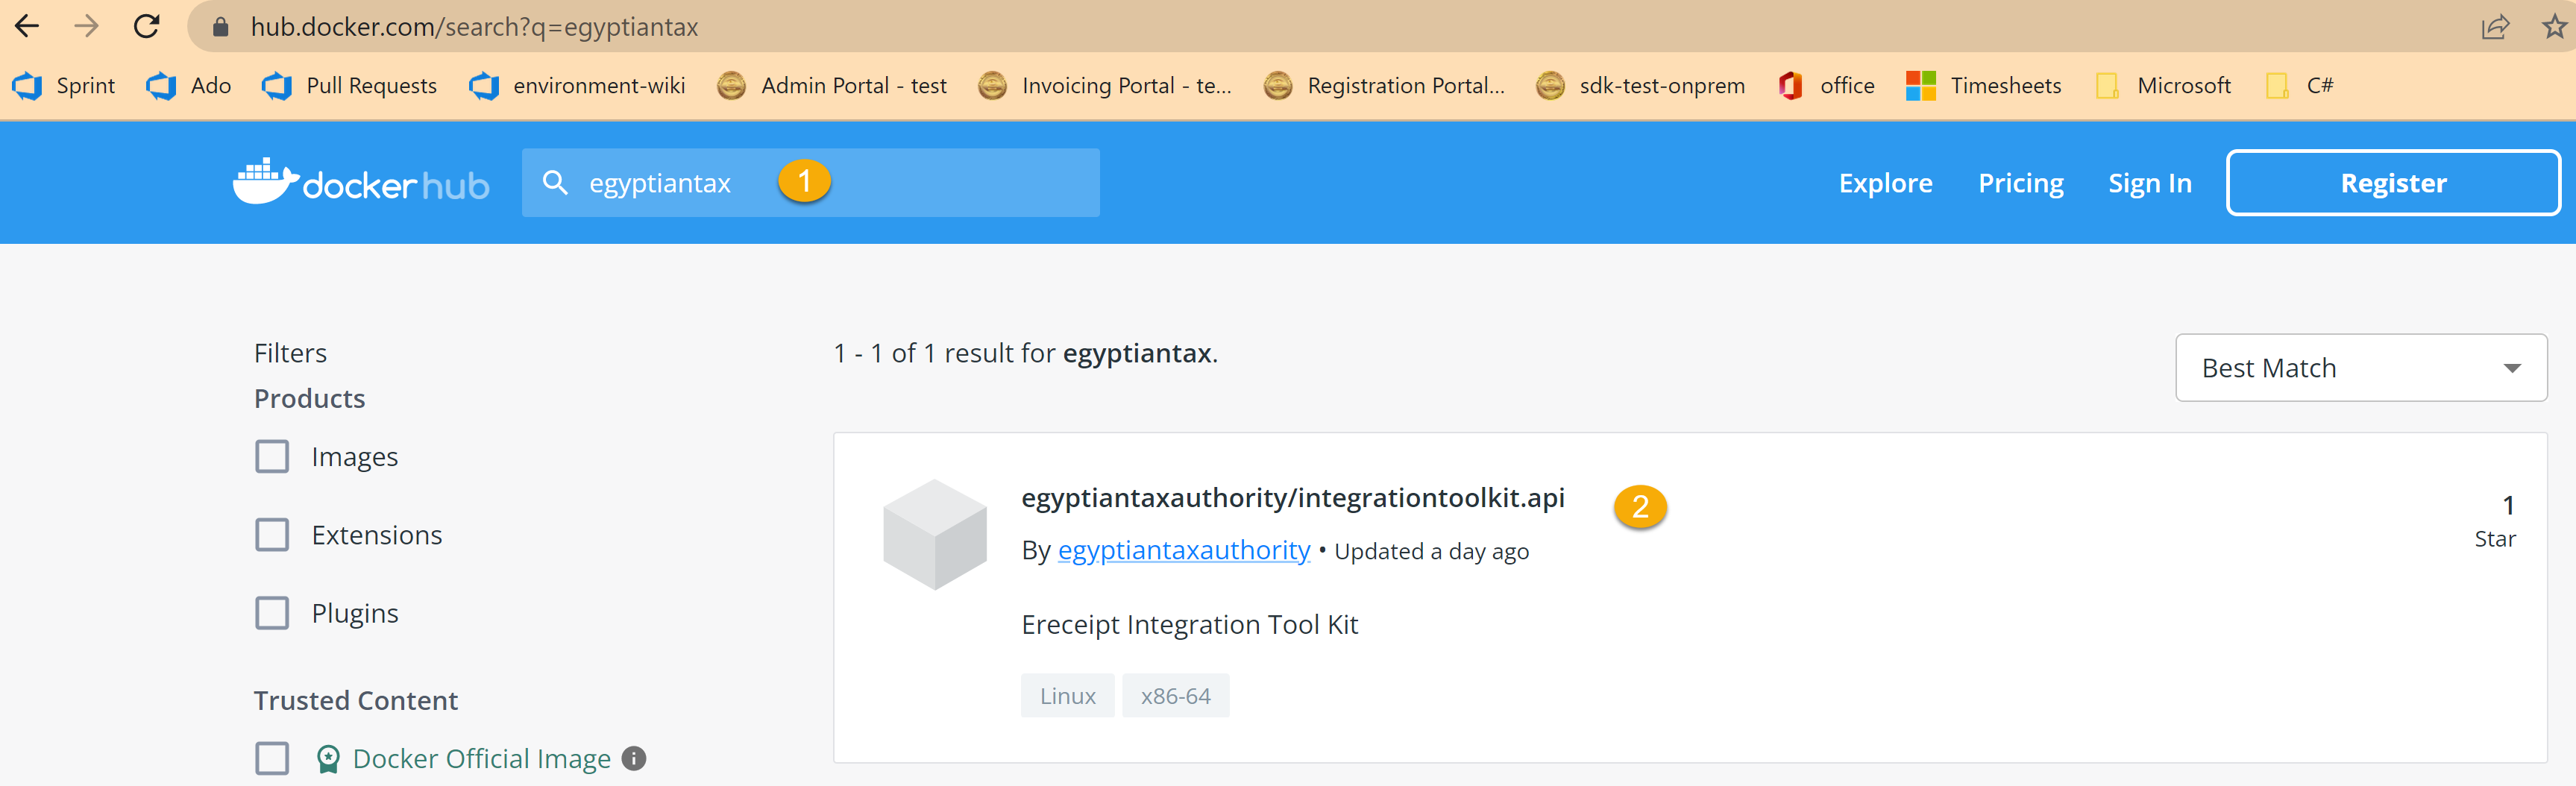
Tags tab will be helpful to search for a specific newly uploaded tag versioned images
Pick the desired toolkit docker image and copy the complete image name along with the tag id.
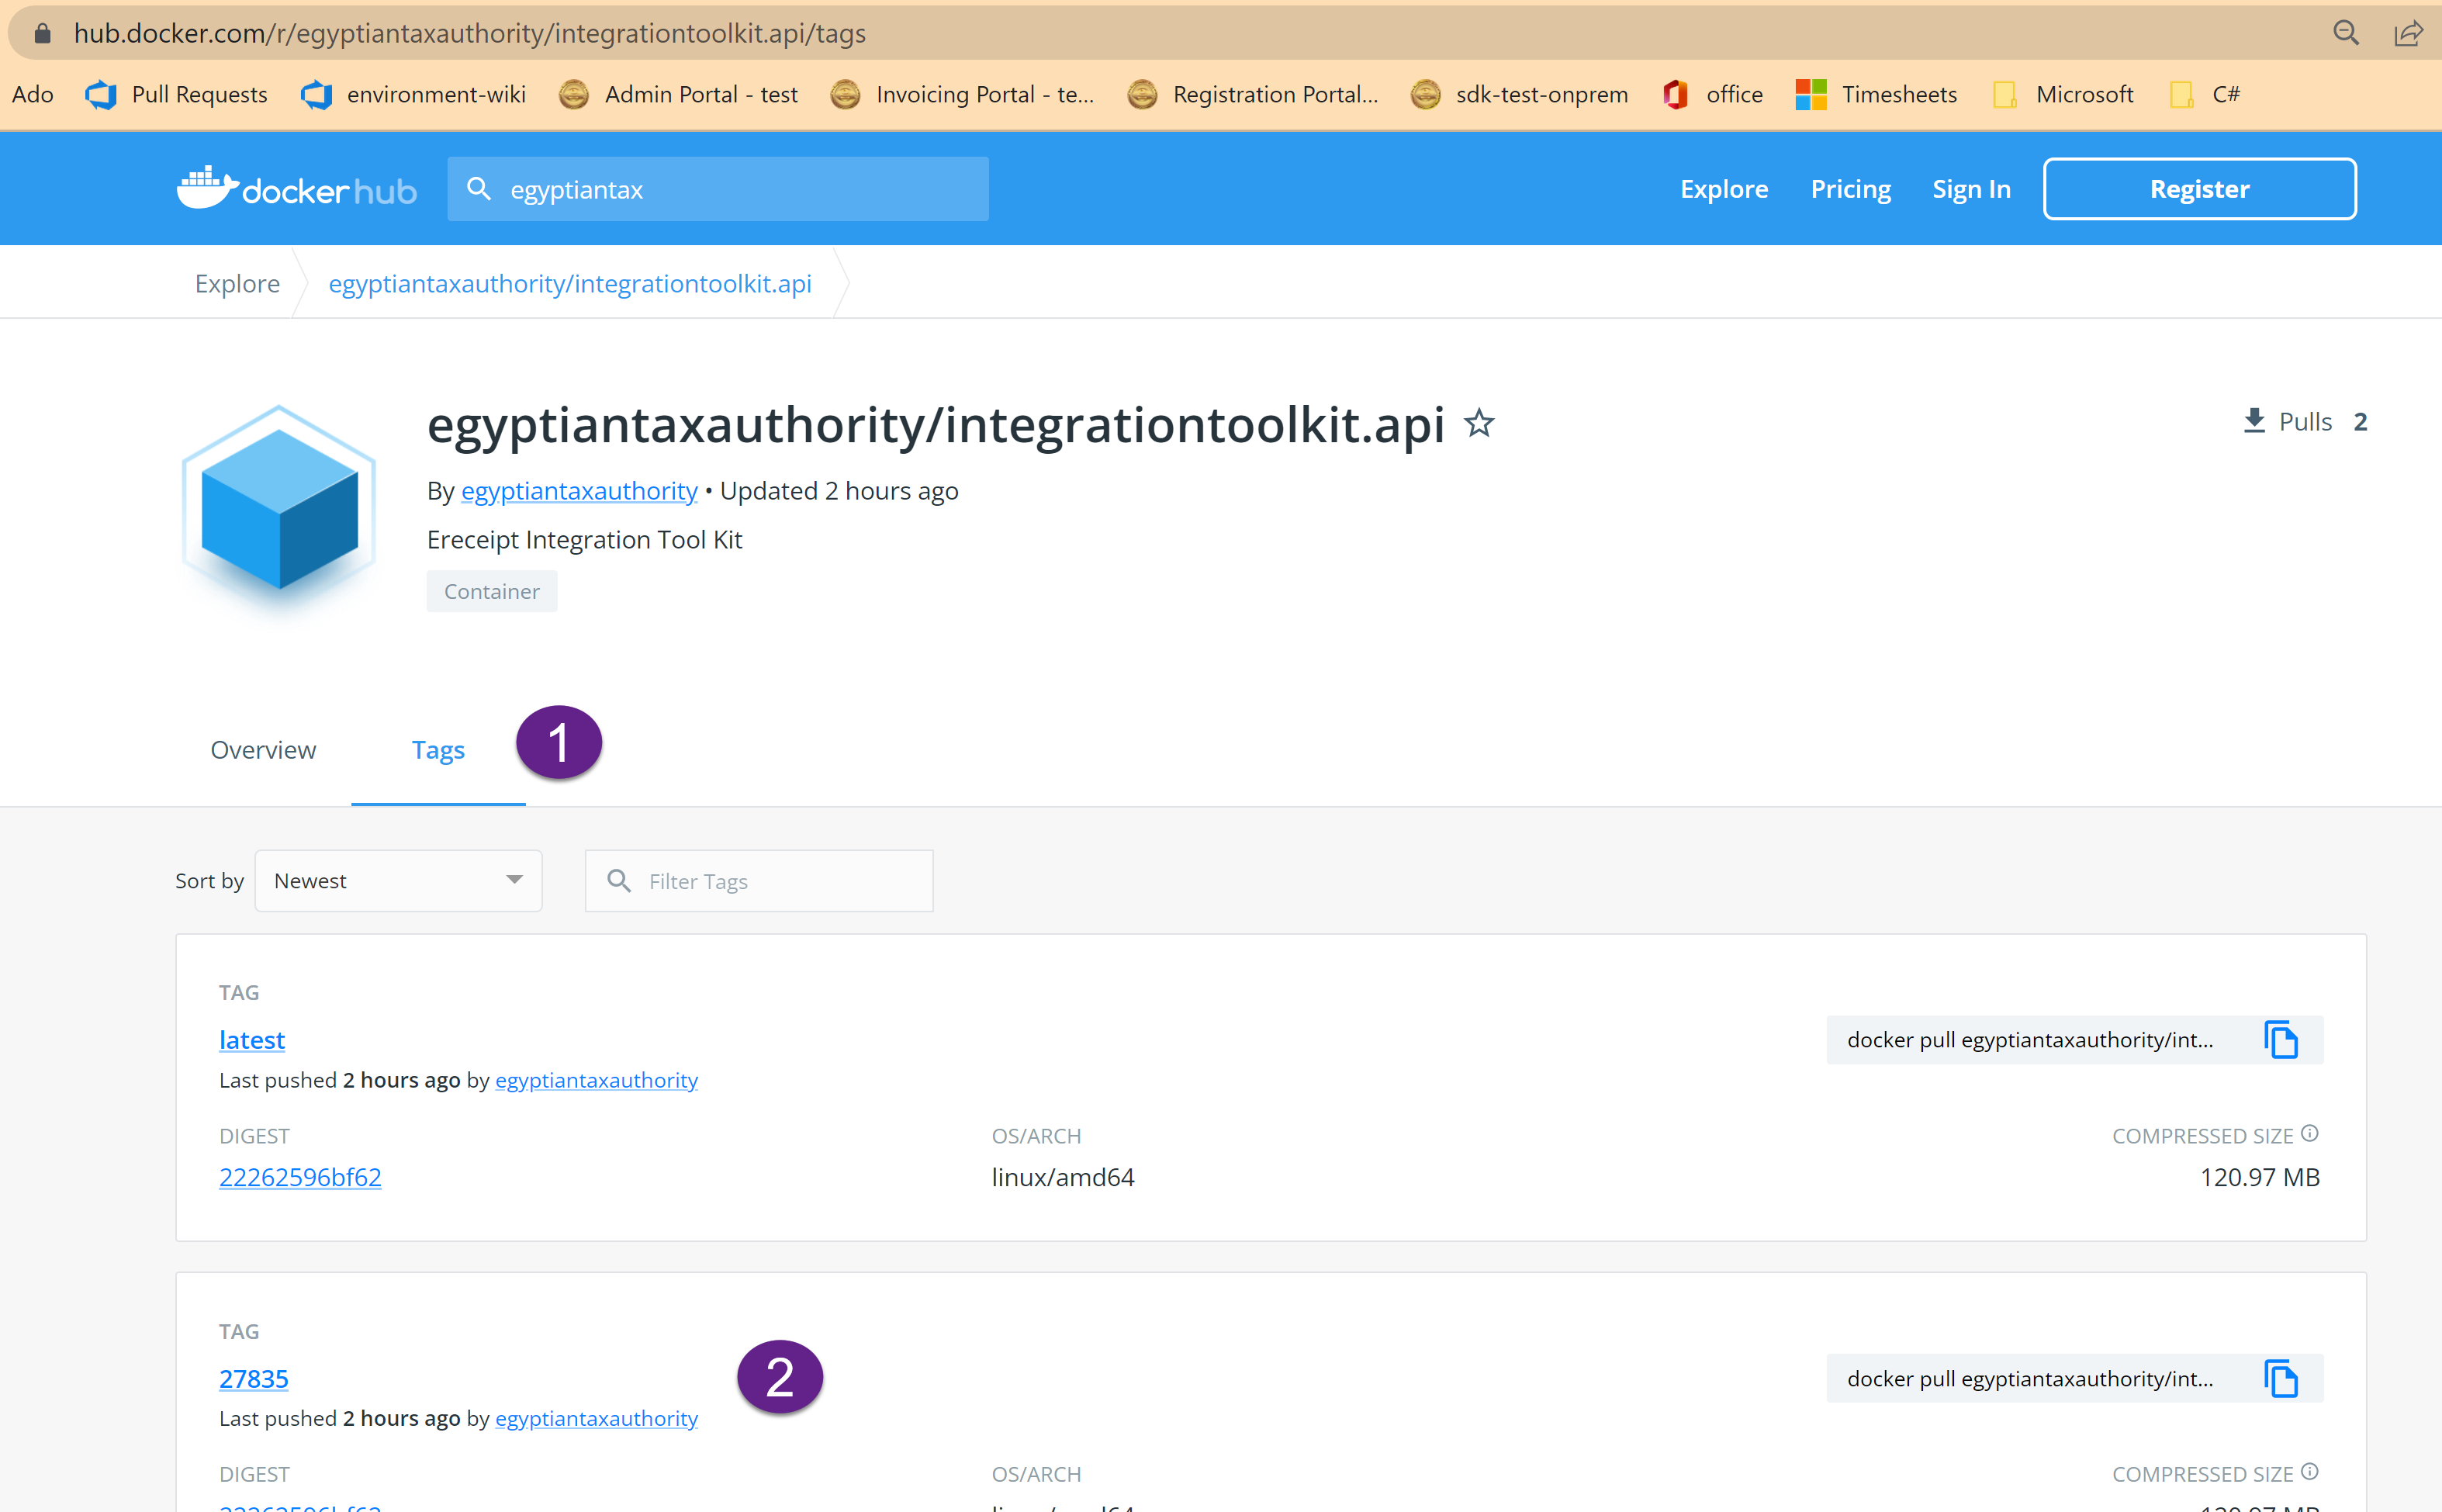
Here is the example usecase docker image name along with the tag id egyptiantaxauthority/integrationtoolkit.api:27835, You can observe more details of the docker image here.
Here toolkit docker image name - egyptiantaxauthority/integrationtoolkit.api
tag id - 27835
Here are the steps to modify docker compose to run the toolkit from docker hub.
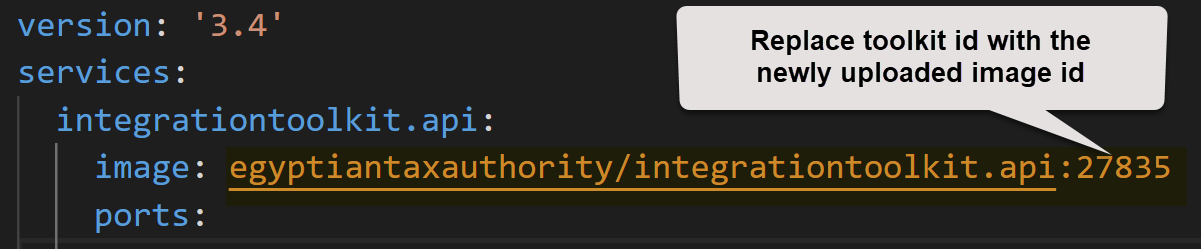
Step 1:
Open the docker compose file
Step 2:
Replace the docker image tag id with the newly uploaded image tag id.
Step 3:
Finally cross check the docker compose file key content like port, environment, toolkit config to make sure.
Step 4:
Make sure Rancher desktop is running, open the windows powershell from the IntegrationToolkit folder path and execute the following command
docker-compose up
Step 5:
Navigate to the below local path.
http://localhost:8020/toolkit/index.html
Note! • Above Step 4 command and Step 5 url should run if docker container is not up and running.
Configure docker compose to run the toolkit image from tar file
Step 1:
Download the toolkit tar file.
Step 2:
Create a folder with the name IntegrationToolkit in your desired location and open the windows powershell from the IntegrationToolkit folder path.
Step 3:
Run the below command from windows powershell, it will load the image from tar file.
docker load --input .\integrationtoolkit.api.image.tar
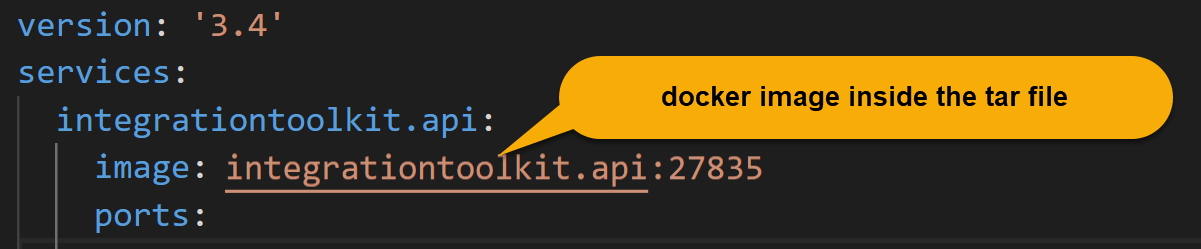
Step 4:
Open the docker compose file, make sure docker-compose.yml file also downloaded and available inside IntegrationToolkit folder.
Step 5:
Replace the docker image value with the tar file image name.
Step 6:
Finally cross check the docker compose file key content like port, environment, toolkit config to make sure.
Step 7:
Make sure Docker desktop is running then open the windows powershell from the IntegrationToolkit folder path and execute the following command
docker-compose up
Step 8:
Navigate to the below local path.
http://localhost:8020/toolkit/index.html
Note!
• Above Step 7 command and Step 8 url should run if docker container is not up and running.
• Docker compose will be the preferable option to run toolkit image from local.
• Docker image can run using docker-compose or docker run commands. In both cases output will be same.
Using docker run command and run it from local
Docker runs processes in isolated containers. A container is a process which runs on a host. The host may be local or remote. When an operator executes docker run, the container process that runs is isolated in that it has its own file system, its own networking, and its own isolated process tree separate from the host.
Docker image also can run using docker run command
Step 1:
Download the toolkit tar file.
Step 2:
Create a folder with the name IntegrationToolkit in your desired location and open the windows powershell from the IntegrationToolkit folder path.
Step 3:
Run the below command from windows powershell, it will load the image from tar file.
docker load --input .\integrationtoolkit.api.image.tar
Step 4:
Make sure Docker desktop is running then open the windows powershell from the IntegrationToolkit folder path and execute the following command
Step 5:
Sample Preprod configuration url’s filled here.
Click here to know more about other environment’s and their configuration url’s.
• “PosSerialNumber” - This config value to be filled with your POS Serial number value and it should be the equal value in all the configurations.
• “LatestImageTag” - This config value to be filled with toolkit image tag.
docker run --rm -it -p 8020:80 -e ASPNETCORE_URLS="http://+" -e ToolkitConfig__LocalConnectionsString="Data Source=/_data/LocalReceipts.db;" -e ToolkitConfig__EtaConfig__IdentityServiceUrl=https://id.preprod.eta.gov.eg/connect/token -e ToolkitConfig__EtaConfig__InvoicingServiceBaseUrl=https://api.preprod.invoicing.eta.gov.eg -e ToolkitConfig__EtaConfig__InvoicingServiceVersion=1 -e ToolkitConfig__EtaConfig__PosSerial=__PosSerialNumber__ -v user_data:/_data integrationtoolkit.api:__LatestImageTag__
Configure dev SSL Certificate to run under https
If you want to run the docker url under https, you need to generate ssl certificate and configure it in local machine(in the current folder for ex: inside IntegrationToolkit folder):
Click here to know more about configuring certicate locally.
Step 1:
dotnet dev-certs https -ep aspnetapp.pfx -p mypassword123
Note!
• To run the above dotnet command, it requires dotnet SDK installed in the machine.
Step 2:
Sample Preprod configuration url’s filled here.
Click here to know more about other environment’s and their configuration url’s.
• “PosSerialNumber” - This config value to be filled with your POS Serial number value and it should be the equal value in all the configurations.
• “LatestImageTag” - This config value to be filled with toolkit image tag.
Modify the docker-compose.yml as mentioned below.
Https enabled Toolkit Docker compose file.
Note! In the below docker-compose.yml content, __LatestImageTag__ & __PosSerialNumber__ are the place holders. Those values are need to be changed with your actual values to setup your POS device.
Here is the Toolkit Docker compose yml.
version: '3.4'
services:
integrationtoolkit.api:
image: egyptiantaxauthority/integrationtoolkit.api:__LatestImageTag__
ports:
- "8020:80"
- "8030:443"
restart: always
environment:
- DBHOST=sqlite3
- ASPNETCORE_URLS=http://+:80;
- ASPNETCORE_URLS=http://+:80;https://+:443;
- ASPNETCORE_ENVIRONMENT=Development
- ToolkitConfig__LocalConnectionsString=Data Source=/_data/LocalReceipts.db;
- ToolkitConfig__EtaConfig__IdentityServiceUrl=https://id.preprod.eta.gov.eg/connect/token
- ToolkitConfig__EtaConfig__InvoicingServiceBaseUrl=https://api.preprod.invoicing.eta.gov.eg
- ToolkitConfig__EtaConfig__InvoicingServiceVersion=1
- ToolkitConfig__EtaConfig__PosSerial=__PosSerialNumber__
- ASPNETCORE_HTTPS_PORT=8030
- ASPNETCORE_Kestrel__Certificates__Default__Password=__YourCertificatePassword__
- ASPNETCORE_Kestrel__Certificates__Default__Path=__/https/YourCertificate.pfx__
volumes:
- type: volume
source: user_data
target: /_data
volumes:
user_data:
Note!
• Docker url also can run under https, but it is not mandatory to run under https.
• https enabled docker-compose.yml file observations:
- "8030:443" - added
- ASPNETCORE_URLS=http://+:80;https://+:443; - added
- ASPNETCORE_HTTPS_PORT=8030 - added
- ASPNETCORE_Kestrel__Certificates__Default__Password=mypassword123 - added
- ASPNETCORE_Kestrel__Certificates__Default__Path=/https/aspnetapp.pfx - added
Step 3:
Make sure Rancher desktop/Docker desktop is running, open the windows powershell from the IntegrationToolkit folder path and execute the following command
docker-compose up
Step 4:
Navigate to the below local path.
https://localhost:8030/toolkit/index.html
Other useful commands, which are related to https
dotnet dev-certs https --clean
dotnet dev-certs https --trust
dotnet dev-certs https --verbose
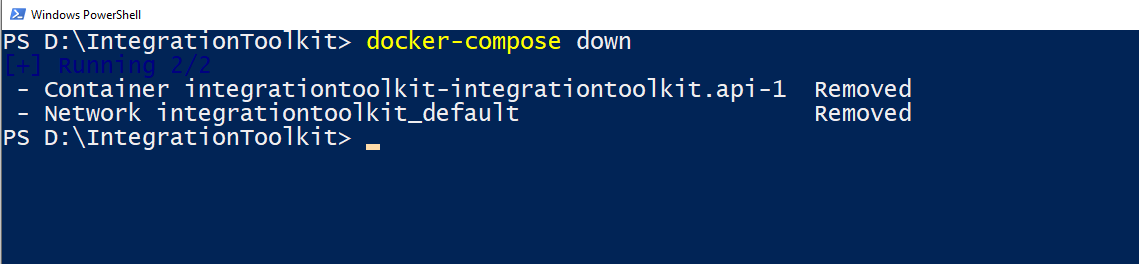
Stop container and close the application
docker-compose down
Copy files/folders between a container and the local filesystem
Specific file can be copied TO the container:
docker cp sourcefile.txt container_id:/destinationfile.txt
Specific file can be copied FROM the container:
docker cp container_id:/sourcefile.txt destinationfile.txt
Example commands:
docker ps
docker cp 21790a79a83a:/_data/LocalReceipts.db LocalReceipts.db
docker cp source.txt 21790a79a83a:/_data/destination.txt
Remove all unused docker temporary content
It will remove all the unused containers, networks, images (both dangling and unreferenced), and optionally, volumes.
docker system prune -a - Remove all unused images not just dangling ones
Docker inspect
It is a command that returns detailed, low-level information on Docker objects. Those objects can be docker images, containers, networks, volumes, plugins, etc. By default, docker inspect returns information in JSON format.
Usage: docker inspect [OPTIONS] CONTAINER|IMAGE [CONTAINER|IMAGE…]
Know more about docker commands.
Know more about other additional configurations
• SQlite configuration
• Toolkit configuration
• Static configuration
• Dynamic/Runtime configuration